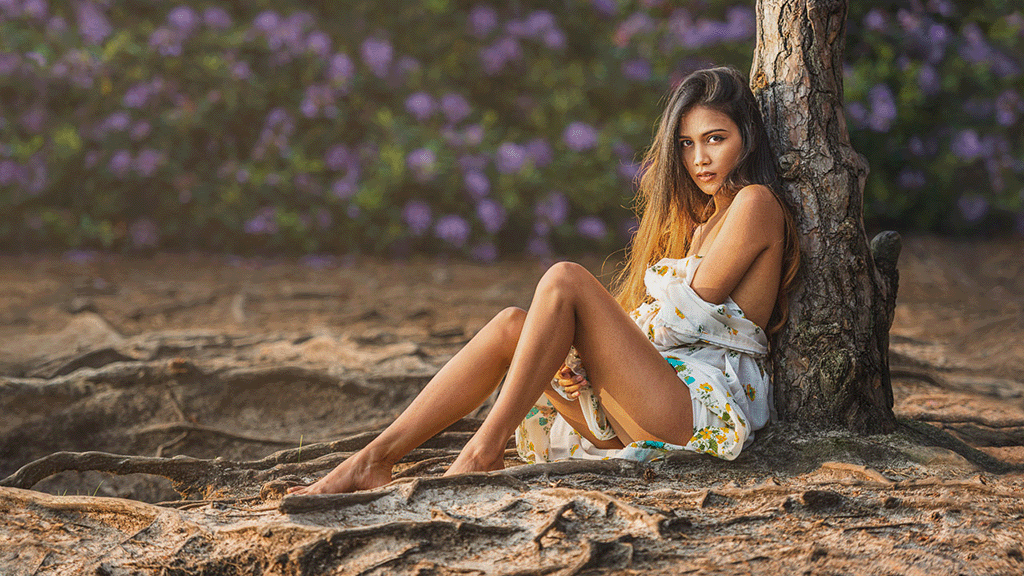
One of the most frequent questions I get asked by students is “how was this lit?” It’s a question you’ll see almost every day in photography groups on social media.
Many years ago, back when dinosaurs roamed the earth, my own photography mentor sat me down and said “once you learn to truly see light, you can never un-see it. You won’t see a glass on a table. You’ll see the highlights and shadows, the wrap of reflections and diffraction through the glass”. It’s true. Ever since then people tend to assume I’m staring off into space, when I’m actually just engrossed by light interacting with everyday objects. Light is ruled by physics.
Although the science behind it is full of complexities, once you have learned even the basics of a few of those rules, and the qualities they impart, it will not only help you become a better photographer but also allow you to deconstruct how an image has likely been created. Whether the light source is a torch, a strobe or the sun, they all follow the same rules.
Lighting Quality – Softness (Soft Light, Hard Light)
The Softness quality of light is measured by the width and depth of the penumbra of the shadow – that is, the graduated area between full shadow and no shadow. If the edge of a shadow is sharp with little or no penumbra, then it has been formed by a hard light source. If it graduates from dark to light over a wide area, it will have been formed by a soft light source.
Control of the softness / hardnessed is achieved by changing the size of the light source relative to the subject. The larger the light source, the softer the light quality. The most important part here to note is “relative to the subject”. The Sun is a huge light source. It’s almost 1.4 million km across in fact, yet on a cloud-free day gives a very hard light source with sharp-edged shadows. That it is because it is a very long way away, so relative to a subject on earth it appears tiny.
A speedlight is tiny, but if you’re photographing an ant with the speedlight a few inches away, it appears very large.
On an overcast day the sun is diffused by the cloud cover, creating a huge light source that is now relatively close to the subject, endowing it with a very soft quality. So by examining the shadows on the subject (more specifically the edges of the shadows), we can start to form an idea of how large the light source was in relation to the subject.
To assess the size of the source, use shadows that have been cast by something with a defined edge, for example on a portrait we could use a shadow cast by the nose, jaw or ear. Don’t be tempted to look at natural contours, for example on the cheeks, as the light intensity will graduate due to the curvature of the surface rather than the quality of the light source.
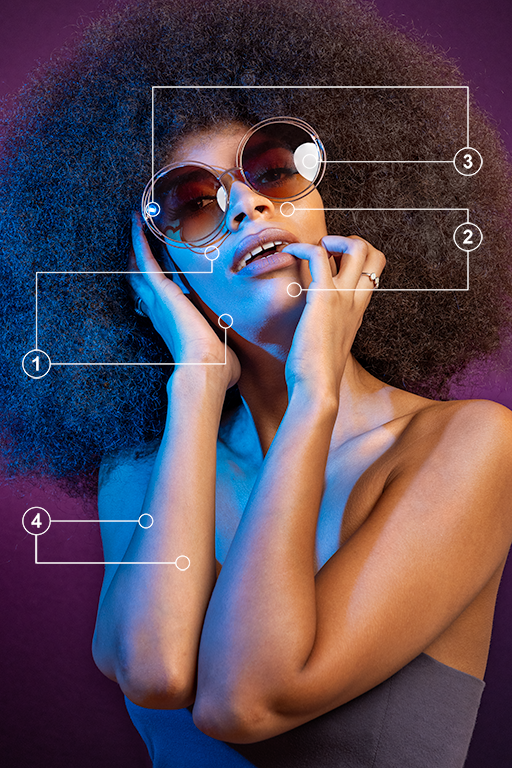
- Sharp edged shadows with little to no penumbra denote a small light source to the left of the camera.
- Soft edged shadows with a wider penumbra denote a larger light source to right of the camera.
- The reflections in the glasses show the difference in size of the light sources, and their positions
- Gels on the individual lights can clearly be seen through colour changes on the skin.
Lighting Quality – Specularity
Often confused with Softness, Specularity (or lack of) is a completely separate quality of light. Specular light is one that has retained its reflective qualities due to the parallel path nature of the light from its source and reflection from the surface, causing bright harsh highlights. Its opposite, diffused light, is one which has had the paths scattered.
The law of reflection states: The angle of reflection (the direction the light bounces off) will be equal to the angle of incident (the direction the light arrives at the surface). Specular highlights such as catch-lights in the eye, can therefore further aid us trace where the light sources were positioned. Light will reflect tangentially off a glossy sphere, so it’s easy to tell just where the source is relative to the camera.
A glossy silver surface inside a light modifier will give a more specular light than a matte white surface in the same modifier. Diffusers or scrims between the light source and subject will further diffuse the light, reducing specular highlights. By applying this, we can get a good idea of what sort of modifier was used.
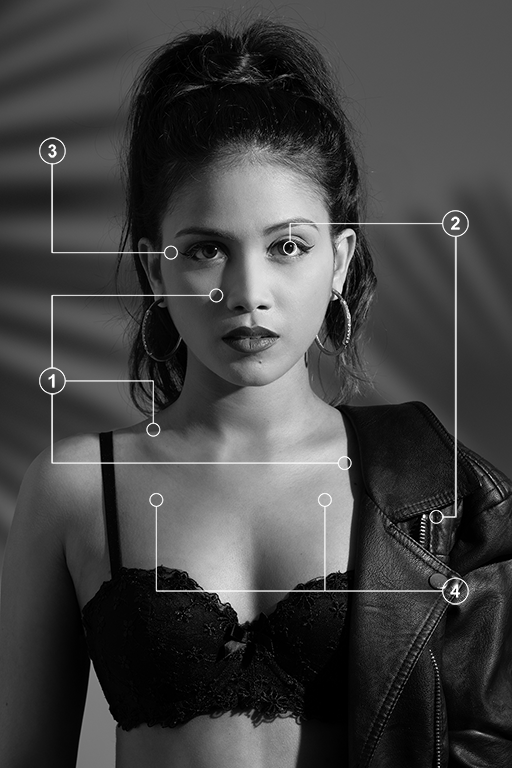
- Assess softness using cast shadows, from areas such as
the nose, jaw, neck or clothing. - Specular highlights such as the catch-lights or shiny
surfaces help pinpoint the light source’s direction. - Reduced depth in shadows indicates a “fill” light
source, or bounced light from the main light source. - A noticeable drop in brightness over a short distance
indicates the light source is close to the subject.
Light Travels in straight lines. (mostly…)
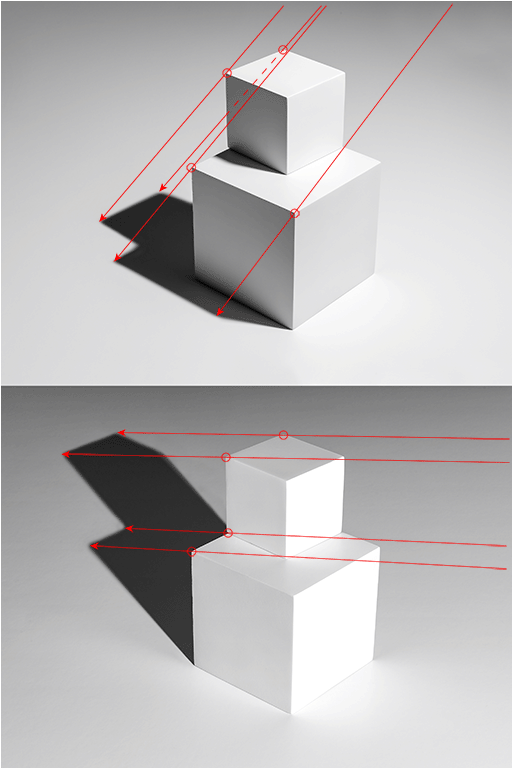
Light travels in straight lines from its source until it hits something. Okay, that’s not entirely true. Light passing through changes in atmospheric pressures and temperatures can “bend” light, but for 99% of us looking to assess an image you’re not going to be dealing with that, unless you’re stood a couple of miles away from your chosen image subject with a very, very long lens.
When light hits something, it is either:
Absorbed (does not bounce off)
Reflected (bounced off in one direction),
Scattered (bounced off in many directions),
Refracted (changes speed and direction) or
Transmitted (passes straight through).
When a shadow is not completely black, it is not because a bit of the light has bent around a corner. (a suggestion I’ve heard frequently) but because another light is “filling” the shadow – that can be another physical source, or light from the main source that has bounced off a nearby surface. Most shadows you encounter will have some form of bounced light lifting it from pure black, because there are reflective elements all around us – even a black wall will reflect a degree of light.
Using this knowledge we can draw lines from points of the shadow, through the corresponding point on the object casting them to learn the direction of the light source. This will give a good indication of height and position.
The more rapidly the lines converge, the smaller and closer the light source. The more parallel the lines are, the larger / more distant the light source.
The width of the shadow will tell you how far off camera axis that light would have been; a wider shadow will be cast by a light further off axis, a slim shadow cast by a light closer to the axis.
Inverse Square Law (and why it might not apply)
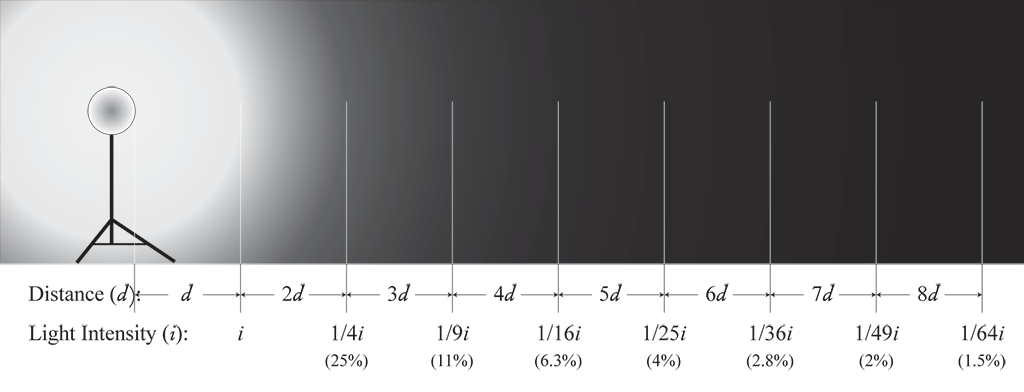
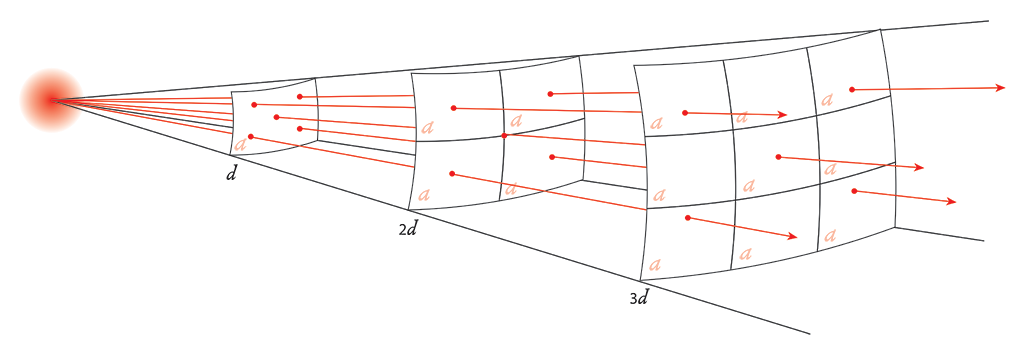
The inverse square law states that the density of light from a point source decreases as the distance from the source increases. The rate it decreases is proportional to the square of the distance between the source and subject.
To help visualise that, if you have a subject stood 1m from a light source, and move them so they are now 2m from the light source (twice the distance), the light hitting them will be 1/4 of the density.
Double the distance again to 4m from the source and the light will be 1/4 the intensity it was at 2m, so now just 1/16 of the intensity it was at 1m.
Conversely, if we moved them from their position at 1m from the source, to a position 1/2m from the source, halving the distance, we would see 4 times the light density on the subject.
You may well have seen this covered in other photographic lighting tutorials, however unfortunately the vast majority of them are misleading. Why? Because the inverse square law applies only to a point light source that is capable of radiating omnidirectionally. The light radiating out from the point becomes less dense as it is travelling tangentially to the surface of the light. When used in a modifier, the modifier can “focus” the light more. The density of light from a laser can remain constant for miles because it’s highly focussed. A bare bulb is not focussed, so the density rapidly decreases. The amount that any given modifier concentrates, focuses or collimates (creates parallel rays) the light will determine how far from the inverse square law the light’s drop off rate will change. The wider the spread of light from the modifier, the closer it will follow the Inverse Square Law. Inverse Square Law is entirely geometric. It doesn’t relate to a photon “losing power” or “becoming less bright”, it’s simply that each photon is spaced further away from the next, the further it travels.
What use is this to us in practical terms? To gain or lose a bit extra power from our light sources, we can change the distance between it and the subject. This trades power against how evenly the subject will be lit. The further the light source is from the subject, the more evenly it will be lit. The closer the source to the subject, the more rapidly the light will drop in intensity across the subject. When analysing a photograph, we can couple that with the softness of the shadow to estimate just how large the light source was. If the subject is both evenly lit and exhibits softness, the light source will have to have been considerably larger than if the subject is softly lit but shows significant drop off in intensity in the direction of light.
Colour Temperature of light
All light has a “temperature” which is measured in Kelvin (K). The lower the K, the “warmer” the colour, with yellow to orange hues. The higher the K value is, the “cooler” the colour, with blue hues. You can often tell when a flash has been used in an otherwise sunlit image as there will be a different colour temperature where it has been used. Ideally to get a fully balanced mix of sunlight and flash, a photographer will ensure the colour temperatures match exactly by using “Gels” – these change the colour of the light from the flash to closer match that of the surrounding ambient light. Often though, this step will be overlooked.

Most flashes/strobes are built with a colour temperature of near 5,500 kelvin, which is around the colour temperature of sunlight at noon on a clear day at central latitudes. Daylight temperature actually varies between a warm 5000K (Morning, Evening) and a cool 6500K on overcast days. Sunset/Sunrise can be as low as 2000K with rich gold hues.
Try to deconstruct an image yourself
Now you have some basics to guide you, why not try giving it a go yourself. Pick some images online and try and apply the above theories to see if you can work out how it has been lit.
If you want my input, I’m only an email away and happy to take a look! You can also get in touch through instagram at https://www.instagram.com/davincent_photography or youtube at https://www.youtube.com/c/davincentphotography
